How to Design an AWESOME dragon cake for kids

I'm going to keep this simple. If you want to make an awesome cake for kids - make it out of Rice crispy treats. You can form it (while still hot) in to any shape. I made my little brother an upright lego man! For this dragon cake - I stacked frozen cake around a gas station plastic cup and then formed the dragon out of rice crispy. For scales I cut fruit rollup into triangles & glued everything on with frosting. For the castle walls. I made chocolate cookies and cut holes and placed hard candy in the hole to make 'stained glass'.   I used a formula scoop for a cookie cutter (protien scoop for those of you in a different lifestyle? :)). I also threw in a couple glowsticks in the 'cave'.My neice loved this cake so much - only problem is it's super time-consuming & now my nephew wants one too.. 

Under all the frosting... 

Under all the frosting... 

Basic Photography: How to Use Your Camera in Manual Setting

What makes a great picture? Content (something interesting!), composition (more on that later...) & EXPOSURE.

Learning about exposure is key to using your camera in a manual setting.

Exposure will determine how much information is collected by your camera via light.

I used to think I could take a photo, not worry about the lighting (i.e., exposure) and then fix it in PhotoShop. Here is why that doesn't work:

1. If you over-expose, you get a ton of light to the point where you have  white spots in your photos. This creates blank spaces - white spots - with no data (or color) to work with, making it difficult to edit your photos.

2. If you under-expose, this is better because you won't get those bright spots - but a dark photo could have a lot of 'noise' (or specks) when you try to lighten it -- it just ain't going to look as good as if you took the dang picture right in the first place. And by right - I mean, perfect exposure.

Perfect exposure will create an accurate representation of the lighting of the object or scene photographed.

Nine times out of ten, the auto setting will be your best friend. The little computer mind of your camera will always calculate the exposure perfectly but... if it's too dark then BAM!, you get an ugly flash.

Why is the flash ugly? Unless you have a great lighting studio or lots of practice with using flash, a flash can wash out natural shadows, lighting and shading - making the photo appear more flat and less life-like..

Using natural light will create a more natural looking photo, so let's dive in to how to be in control of exposure by using manual settings.

Read your camera manual to learn how to put your particular camera in Aperture Setting, Manual Setting and adjust ISO.

Read on to learn how each of those settings can give you the freedom to take a perfectly exposed picture (and learn some cool effects).

The three pillars that make up Exposure are: ISO, Aperture and Shutter Speed. You can adjust them manually to A) create great lighting without using a flash, and B) try out some fun photography techniques.

Here is a quick description of each of those pillars:

1. ISO is how sensitive the digital film is to light. I usually just leave that alone because although increasing the ISO may allow for more sensitivity (yay! more light!), a high ISO can cause grainy photos.

2. Shutterspeed is the speed the shutter of the camera opens and closes. The longer you leave it open, the more light/data will come in. With my camera, the fastest shutter speed can be adjusted from 1/4000 second to 30 seconds.

3. Aperture is determined by the aperture number, also known as the F number - which is how large the hole in the lens is to let light in. Here's something even more confusing: The larger the hole, the more light is let in and the SMALLER the aperture number (or again, F number) My camera goes from F4.0 (large hole) to F32 (tiny hole).

So, let's focus on using your camera in these two manual modes: Shutter Speed Priority (TV) and Aperture Priority(Av). If you manually choose Shutter Speed Priority, the camera will automatically figure out the perfect aperture (f number or size of hole to let light in) to get the perfect exposure. If you manually choose Aperture Priority, the camera will automatically figure out the perfect shutter speed to get the perfect exposure. Okay! Now the fun stuff....

Why choose Shutter speed priority?

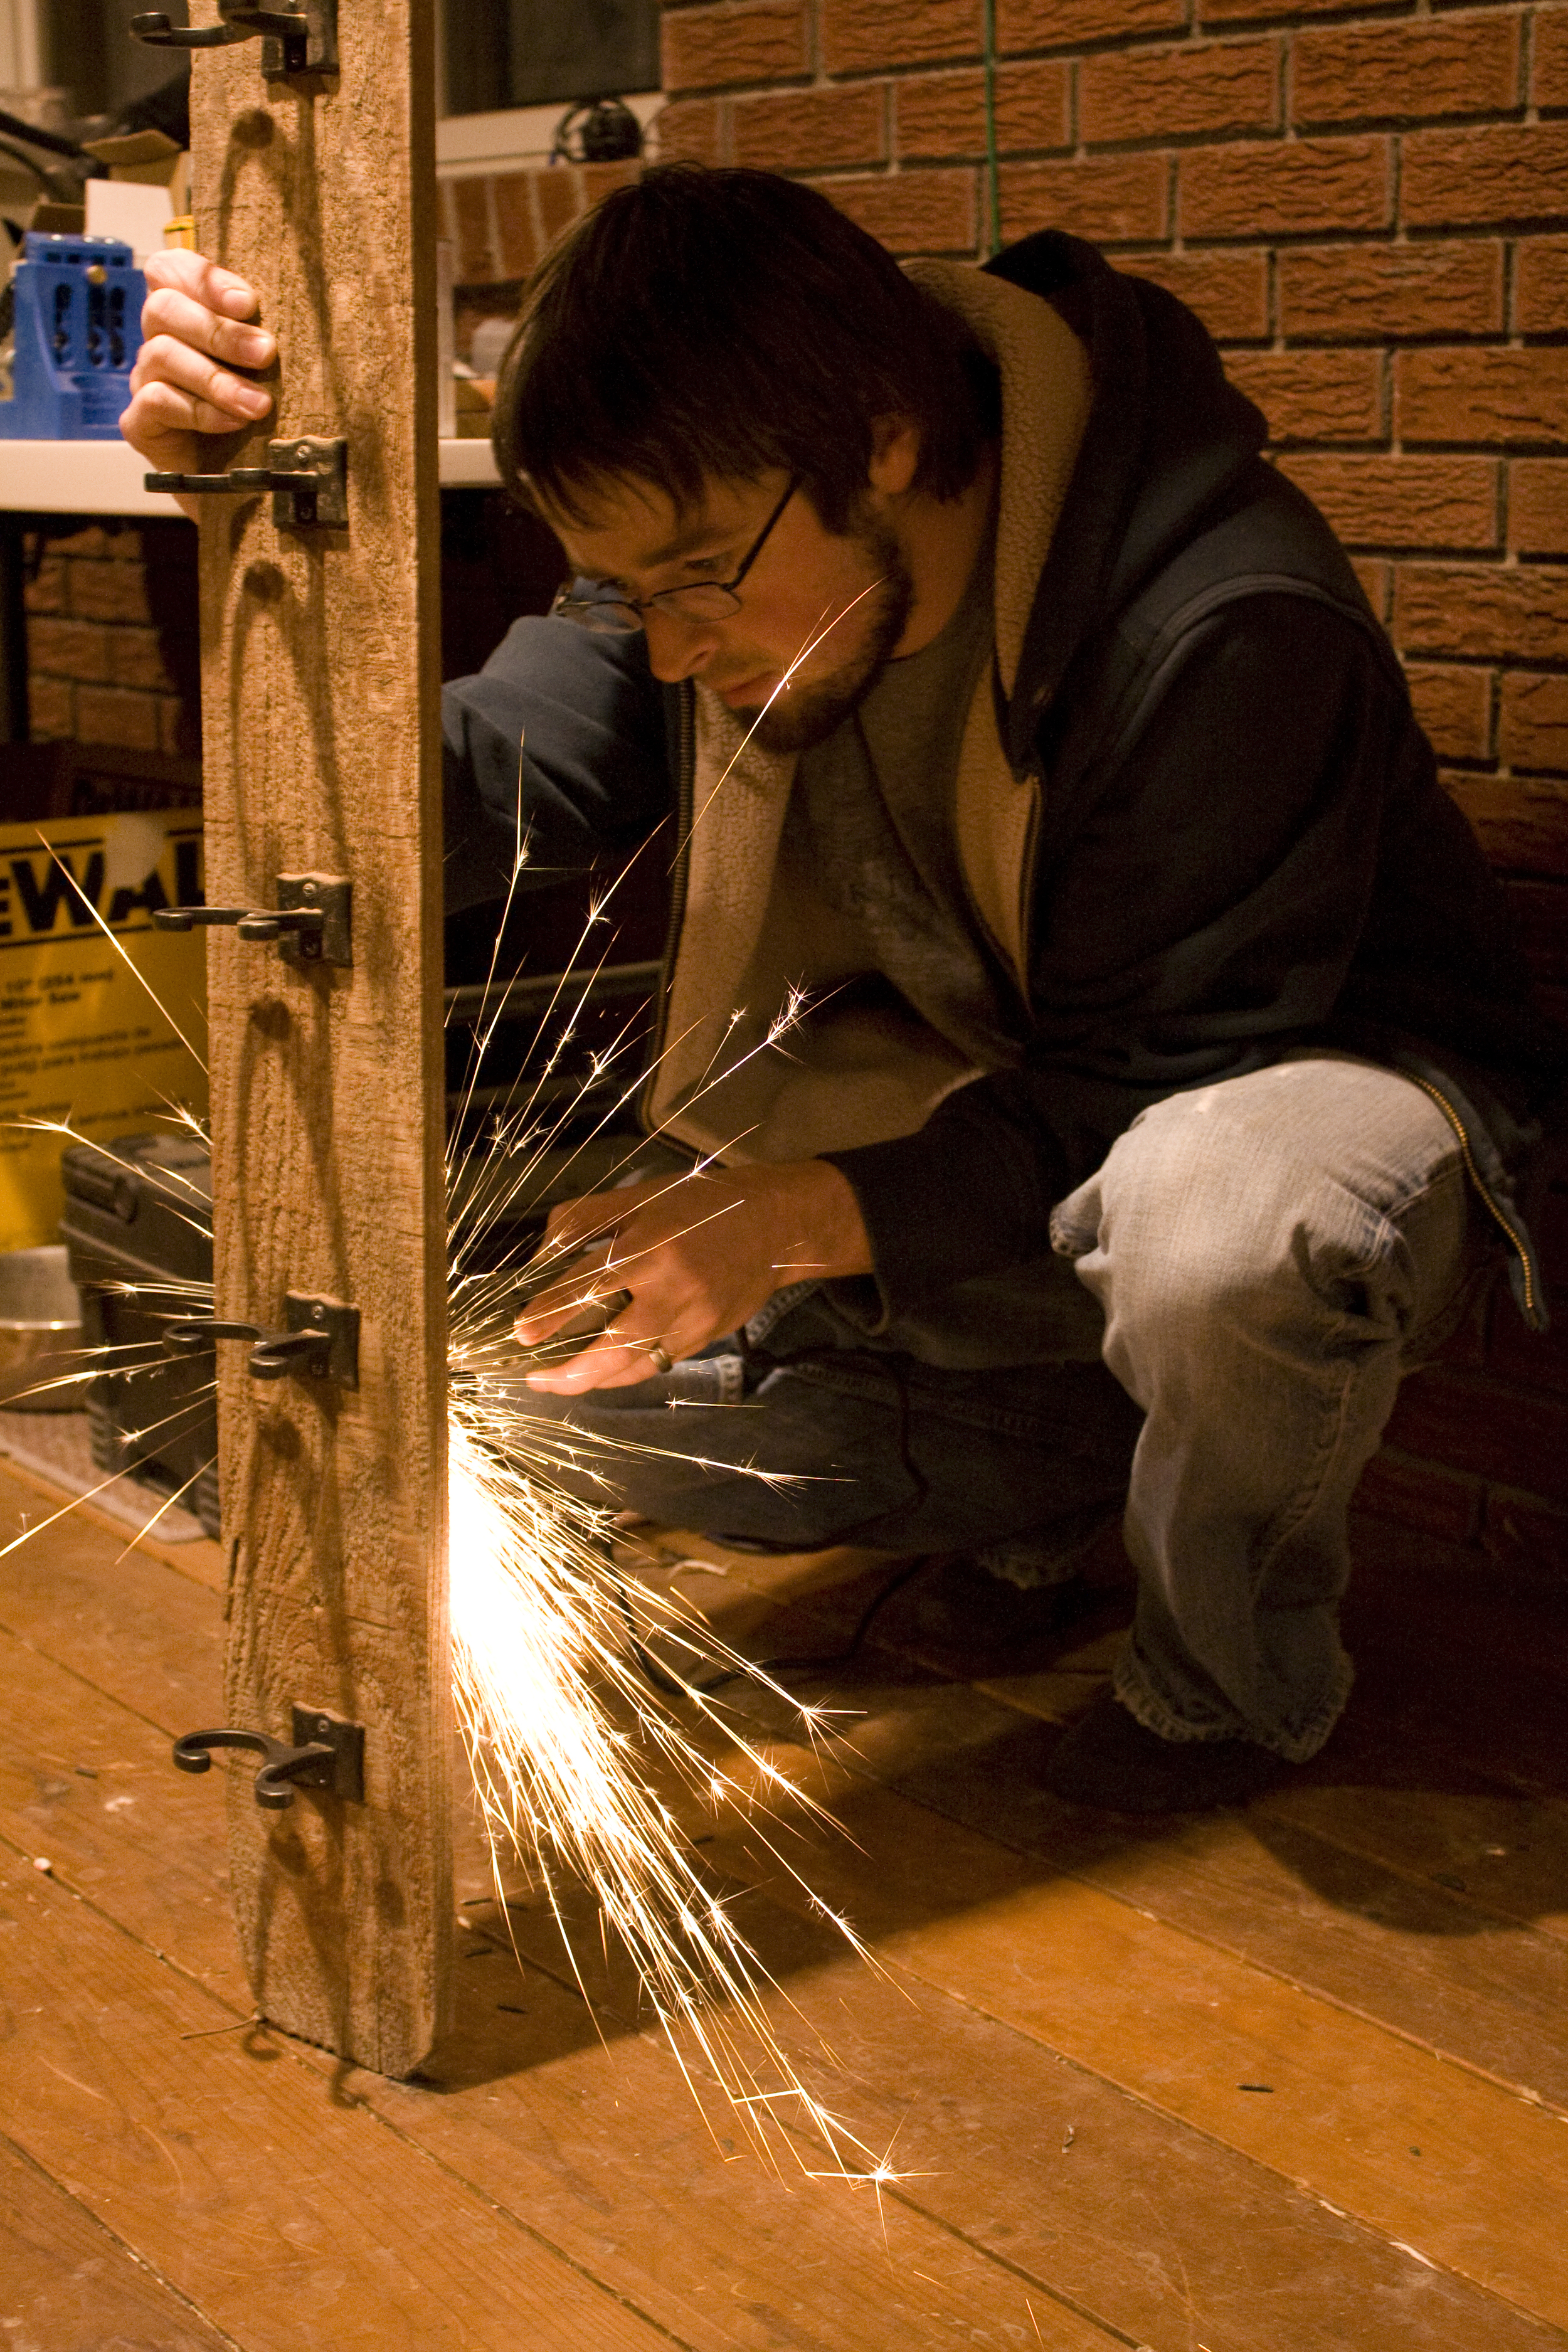
Shutter speed is a great way to let in light and get a crisp photo if your object is STILL! If it's moving (such as a sparks or water or a running horse) a long shutter speed will just get you a blur. Sometimes you want things blurry  to show movement in your photo. See the example below - longer shutter speed allows for more light in the photos of the flowers. In the photo of my husband using a Dremel, the longer shutter speed allows for more blur of the sparks. In the photo of my niece and nephew in the rain, a longer shutter speed allows for the rain to be blurred giving, again, a sense of movement. You just have to find that sweet spot where the rain/sparks is blurred but the rest is not (also, don't forget if your holding your camera you will most likely shake and cause the scene to be blurred - use a tripod and a timer/remote rather than pressing the button with your finger to to avoid this!)

Exposure_1.jpg

Why choose aperture priority?

Aperture determines the DEPTH OF FIELD. (This is how far in front of you the camera is going to put in focus).

Ever see those photos with a sharp foreground and blurry background? This is a shallow depth of field. A lower aperture number (i.e., larger hole in the camera to let light in) will get you a shallower depth of field. By putting an object in focus and blurring the background, your photograph will mimic how you naturally look  at objects, thus creating a beautiful, natural effect. For example, when you are talking to someone, subconsciously, you are focused on him or her and the world around you is not in focus, i.e., blurry!

Ever see a beautiful city scene where everything in the photo is nice an crisp? This is a large aperture number (tiny hole). Did you ever make a tiny hole with your thumbs to see something far away (yes, that was me as a kiddo when I was needing yet another new glasses prescription). Same thing.. .A large aperture number will create a crisp setting for a large scene. See the example below.


Frankly, you won't get this stuff until you go try it and take example shots. Use auto mode for important moments until you get lots of practice with manual modes. Don't get a blurry photo of your kid graduating because you were practicing shutter speeds.

If you are really interested in photography, I HIGHLY recommend Great Courses Fundamentals of  Photography by National Geographic Photographer Joel Sartore. It a DVD series with tons of examples and assignments. It is way cheaper than a college course. Joel Sartore is incredibly thorough with tons of examples - it's one of the best courses I've ever taken. 

Now, just to be clear - I am a graphic designer, not a photographer. I learned photography because nothing sells better than a beautiful photo and often it's just easier for me to go take the photo myself.

Also, artsy photos can be amazing and stunning, but sometimes people just want a simple photo that represents clearly what they are trying to sell or market. Take for example the 2014 Bandelier Photo Contest. The one in the upper right is the winner, the one in the upper left is one I took and decided not to enter because I thought it would be to cliche (as proven by the postcard I saw at the grocery store in the lower right). The winner's photo was super simple & yes, so cliche ---  but that is exactly what Bandelier wanted and felt represented them...

Love this photo by Maria Thibodeau. She clearly has photography skillz.

Love this photo by Maria Thibodeau. She clearly has photography skillz.

Okay now for some extra credit. Can you figure out how the photo below was taken?

Answer: I used our dance party strobe light with an long shutter speed. The flash causes darkness to be registered between movements giving it a ghost like appearance. This cool technique won me the thrill of being one of the weekly Editor's Picks for the Smithsonian Photo Contest.

Make your REUSABLE BAGS FROM BAGS! & enter to win massage

This project is in celebration of Earth Day! Yay! I am going to have a FIT Massage 1 hour massage giveaway! Comment below and I'll add you to the drawing. The massage is located at FIT Massage in Los Alamos, NM. Win one for yourself, or perhaps as an upcoming mothers day gift to a special momma? If I get over 20 comments, I'll give away two massages. How is this related? A. I think everyone deserves to be pampered once in a while and B. I designed the gift card! ;) ENTER BY SUNDAY NIGHT!

Back to Earth Day - It's crazy how many plastic bags I collect - not just grocery store bags, but bread bags, cereal bags, snack bags, cheddar cheese bag, potato bags, marshmallows in bags, frozen veggie bags - yikes! Well here is a project that can take all that nasty plastic (that for the most part you can't really avoid) and creating reusable grocery bags! You need: an iron, parchment or wax paper, a needle and thread (or, sewing maching...) and your bags!

Step 1: Collect your bags. Yep, when you run out of cereal or cheese or go shopping at macy's - keep the bags! Keep in mind that colorful bags and logos make for a nice final product.

Step 2 - Place bag between parchment paper and iron down. If it is a thin bag, you might need to melt, then layer on more bags (melting one at a time) until you get a thick plastic panel. Create enough panels to sew a market tote bag. Keep in mind the size you want (is there going to be celery or gallons of milk in there?) Make sure you make it big enough to hold groceries and the plastic is thick enough. Cereal bags are pretty thick, so maybe use those as the bottom of the bag. 

Step 3: Cut out panels for the pieces for your bag, and sew together to create a market tote. For straps, this is the time to use an old belt or cut up that gym duffel you never use... ;) Or you can even iron together scraps to create a handle. Attach and you are ready to shop (guilt free!)

My sister taught me this technique and it has opened my eyes to how much plastic is in my life and has given me a way to reuse it in meaningful way. Good luck and don't forget to comment below (especially if you are needing a massage ;))

Sista Julia made all the bags below from a bag collection of my other sister Sophie. 

Sista Julia made all the bags below from a bag collection of my other sister Sophie. 

How to Find Free "Inspiration" & Medieval Cookies

I used to be so nervous about copyrights. Everything is copyrighted! I mean come on, you can't even sing Happy Birthday in a restaurant without having to pay someone a $700 royalty fee. (Yikes, flashbacks of me as a waitress singing - I DONT KNOW BUT IVE BEEN TOLD - SOMEONE HERE IS GETTING OLD! yep, those awful yet joyfully embarrassing songs are due to dang copyrights.)

"Inspiration" and "stealing ideas" might be used interchangeably. Unless, you tap into the incredible non-copyrighted world which includes: Everything God created (make that floral pattern from YOUR photos of YOUR flowers! there's an idea!) , public domain such as (most) photos from .gov website or creative commons and anything SO OLD that well, no one is coming to sue you. How old? Read more from the government himself.

So! I took the following photos for free ancient "inspiration". You can see that swirls, hearts, and beautiful patterns are not a new thing. This does not mean use other people photography of ancient things - you gotta go take the photos. I also don't mean replicate this stuff and claim it as your work. This is solely inspiration and can be used as such.

Random photos from my traveling days. I'm sure you can find some inspiring patterns closer to home.

Random photos from my traveling days. I'm sure you can find some inspiring patterns closer to home.

Disclaimer: It's been a while since I took copyrighting and perhaps some information has changed or will change. Either way, I am not a lawyer just a designer aka right-brained aka not a lawyer!!! Please do some more research if you have more questions or send me a comment :)

Now I also took some photos of some medieval looking tiles at a park in Spain. From there I created a medieval color palette using an eyedropper tool (Don't have a program such as Photoshop or Illustrator? Try freeware such as ColorZilla or Gimp to figure out colors!). Then I created some medieval cookies for the sole purpose of well, because it was a creative outlet and my hubby loves sugar cookies. Anyways, here are the results:

This looks complicated, but not really. Mix Royal Icing and add blue, green food coloring. To make gold, add about 10 drops of yellow to every one drop of blue and one drop of red. Pipe using parchment/wilton cone or if you're cheap like me, a plast…

This looks complicated, but not really. Mix Royal Icing and add blue, green food coloring. To make gold, add about 10 drops of yellow to every one drop of blue and one drop of red. Pipe using parchment/wilton cone or if you're cheap like me, a plastic baggy and snip off the corner to create thin lines. When photographing, position cookies so you don't see any major mistakes :)

I learned how to create thin lines on cookies from Julia M. Usher. She is awesome!

Creating Color Palettes from Nature and Photographs

Colors can either harmonize with each other or create a total disgusting cacaphony. Here's a quick example: When we first moved into our house the cabinet color seemed SO UGLY! It was SO YELLOWY! The walls were a creamy yellow as well so the kitchen just made me feel a bit sick. My mom (artist and momma for 30 plus years) suggested instead of ripping out the cabinetry, just change the colors of the walls! We painted them a blue-grey Sea Haze.  The sea haze complemented the warm yellow of the cabinets and made the kitchen look inviting and well, warm! WOW. I just saved myself 10,000 remodling costs by just painting the a complementing color!

Picking a color palette for anything from your business to your kid's bedroom may be a daunting task. Luckily, there is lots of help out there. If you don't know your basic color theory I highly recommend this video by Karen Kavett. I am constantly visiting Color Scheme Designer 3: This site will generate colors schemes if you input the hex # for one color. E.g., you love bright purple for your living room. What the heck goes with that? Enter the hex # of the purple - or pick it out on the color wheel and you can come up with some solid color palettes (monochromatic, triad, complementary, so on). Easy.

Well, lets say you want something a little more custom. My theory is that when you look at a harmonic color palette it probably reminds you of something you see naturally. I threw together a few photos to show you some examples below: 

I created these from photos I have collected over the years in Boston, at the Zoo, Organ Mountains in Southern New Mexico, Paris (photo by my sister Kristen), hiking in California, etc. I'm sure you don't have to go too far to find something similar.

Tshirt Designs: Screen versus Digital Printing

A new print shop is in town - JCS Printing. Josh Stringer (co-owner) printed out these lovely t-shirts I designed below. The black one is digitally printed and the blue one is screen printing.

What's the difference you ask? Screen printing you get a custom screen for your shirt (basically a giant stamp) that you can load with ink and get vibrant colors - especially on dark shirts. Problem is each design needs a custom screen setup (major chunk of the cost) - not ideal unless you need mass quantity and cheaper if you have less colors.

Digital, on the other hand, is much like printing with an Ink Jet printer - you can get loads of detail & colors. It slightly absorbs into the fabric so you don't get that ironed-on- design-t-shirt feel. It's also bit more economical because there is no custom setup. For my situation, Josh did the digital for the black shirts and although it printed a bit darker than my original design, they look awesome. 

The LA Rugby Bombshells is screen printing - ideal because there is only one color and they wanted it very vibrant on a darker shirt. They also needed loads of shirts and sweatshirts so the setup was worth the effort.

JCS printing had a quick turn around and Josh was totally about making the customer happy (for picky me, that was really nice!). Their company has competitive prices and is local (wha?!). They do t-shirt printing and pretty soon here will start doing embroidery (yay!). I'm going to monogram everything I own... Totally recommend them and will use JCS Printing again!

Yes. I am aware that everything in Los Alamos is bomb-themed.

Yes. I am aware that everything in Los Alamos is bomb-themed.

The front of the t-shirts.

The front of the t-shirts.

You can reach JCS Printing at jcsprinting@gmail.com or at 505-709-8885. 


Pullover Sundress - Don't be afraid to try to sew!

For us 'non-sewers' - it's intimidating. The moment you start that dang machine and thread wads up, the needle bends and then you find the bobbin is empty - is it worth it? Yes! I made this pullover sundress because my mom had ordered matching Naartjie outfits for my girls for Easter and the company had run out of the tops in the correct size.  I glued ribbon on top of all the mess ups and uneven edges & I think (from a distance) it looks great! I remember my mom making me a dog-print dress when I was a little girl, and it was really special so again, totally worth it.

Sister Julia gave me this pattern as well as fabric so I had no excuses!

Sister Julia gave me this pattern as well as fabric so I had no excuses!

Bench Makeover

This bench was too cute to throw away.  A little thought with regard to the color palette for the safari scene and some freshly-stained ash wood and voila -  it's a bit more inviting!

Made with Ash wood, stained with Minwax Cherrywood & painted with Acrylic paint. Sealed with Minwax Helmsman Spar Urethane for outdoor use.

Made with Ash wood, stained with Minwax Cherrywood & painted with Acrylic paint. Sealed with Minwax Helmsman Spar Urethane for outdoor use.

Before picture - not bad - the bench piece wasn't actually missing I took it off to measure and well, didn't put it back...  I wanted new wood, and brighter colors for the safari scene. 

Before picture - not bad - the bench piece wasn't actually missing I took it off to measure and well, didn't put it back...  I wanted new wood, and brighter colors for the safari scene. 

I went to the hardware store and ran into Alec Caspersen from ADC Builders. He offered to cut some scrap ash wood down for $20. They have a new Kitchen Demo room, if you need remodeling, it's worth checking out! This was half the battle - the hardware is actually steel but we spray painted it (we'll see if that stays!) Other trick: the painted animals are outlined in black sharpie to make the colors pop!

Letterpress Printing

Gutenburg invented it. It's timeless. It's lovely. It's letterpress.

I tried out a local letterpress printer, 12 Tons of Letterpress, for some personal coffee bags.  Bram Meehan, the printer, sent me a photo of the press & printed bag (posted below!). The bags are beautiful. He does wonderful work - he can even print very thin lines. I complemented business card at an AIGA meeting and it was indeed 12 Tons of Letterpress work! The card was for Think all Day - the logo is a really thin T. It looked perfect.

Letterpress is printing old fashion style - using ink & a press - the main form of printing until the 20th century. It is currently used as an artisanal form. I highly recommend this printing if you want a one/two color 'stamped' feel to a project. Letterpress looks amazing for business cards and wedding invitations, and well, coffee bags!

IMG_0287.jpg

Fence Post Coat Hanger

Diaper bag, four coats, purse, baby front pack, two hiking back packs, keys - this is what you would find on our living room floor so, we needed a solution. This was a successful illustration of how being lazy and stingy pays off - we bought hooks and then decided to screw them into an old fence post  (rather than follow through with our original idea of nice finished cedar wood shelf- rack). We did absolutely nothing to this wood. It retained the rustic-unfinished look for which people pay top dollar ;) 

yep, that's a fence post.

yep, that's a fence post.

Okay you caught me - Ian did most the work. He had to dremel off the part of the screws that stuck out. This gave me an opportunity to play around with shutter speeds on my camera. This pic is at 1/8 s.

Okay you caught me - Ian did most the work. He had to dremel off the part of the screws that stuck out. This gave me an opportunity to play around with shutter speeds on my camera. This pic is at 1/8 s.

Chocolate Lace Cake Wraps

I wanted to try this Julia Usher Cake Lace out for a test run for my sister's baby shower.  I am no cake decorator, but I found this this was surprisingly easy if you have patience and fairly good handwriting.. I just microwaved chocolate chips in the microwave, scooped it in decorating bags and snipped the tip of the bag (no need for fancy tips which is nice...) This was for a valentines day lunch so I added chocolate covered strawberries.  I was up until 11 doing this - it was so fun! As you can see my table was a disaster, and I just taped parchment on whatever to use up all the chocolate... :) It's way easier than it looks. You can also make doilies ahead of time and stack them in the fridge to make an awesome placement for a special dessert for a special someone... Although this, by the way, was not for my husband. He's getting mail-ordered steak :) 

See video 

Designing Fabric

This is so much fun! I ended up making a custom fabric for my mother-in-law and daughters for Christmas! 

You can do this at spoonflower.com. They have great videos and ideas on YouTube - apparently you can make fabric from a photo! 

My m-i-l loves sewing so I made her a custom seal of the mountains behind their house in Montana. MY 18-month-year-old loves her dog so I made one with the dog and we always sing the Richie Valen's "Oh Donna" to our other daughter (Donna...) so that - in a nutshell -  explains the designs.  :)!

blog 2.jpg
blog 1.jpg

Gift Certificates

Gift Certificates for a service are an awesome gift because it allows your loved one to guilt-free get what they want & when they want it. Melissa (owner of FIT Massage) made some, put them in candy bags and tied off with a ribbon - they turned out quite cute:

Facebook advertisement for Los Alamos Local.

Facebook advertisement for Los Alamos Local.

Dresser Makeover! problems solved...

I have to admit I am pretty proud of this dresser. Not only is it a super cute color but I solved two major issues with a dresser of this size: 

1. One year-olds love opening drawers and pulling everything, I mean EVERYTHING out just for the fun of it.  Knobs = GONE.

2. Only I know the intricate ins-and-outs of these 9 drawers. Every time my husband needs PJ's or socks or a bib, he has to ask me where to find it. How awesome are chalkboard labels that can change as needed? (e.g., when onesies turn to pants/shirts) And, when my little one gets old enough to put away her own laundry (hmm, say by age  2?) I can draw pictures to show her where to put things before she can read. 

"Paint something with chalkboard paint and you're so DIY!" was the message I got from mom-blogs -  I felt like chalkboard paint was a bit over-used and over-stated. Alas, I have to admit it's all its cracked up to be. I had a bunch left over so I painted a little book shelf so it would match - the shelf is now laying on the floor and used as a chalkboard table... One-year-olds can't seem to push crayons hard enough to draw nor can they put tops back on markers - so chalk is a pretty fun alternative for scribbling all over stuff...


I bought this cute rug to tie together the red and yellow furniture in the room...

I bought this cute rug to tie together the red and yellow furniture in the room...

Before. 

Before. 

Pumpkin Ribbon Bread! & fall-week meal plan..

Okay, so it has been pointed out that my 'blog' aint really a blog, but just a display of random projects - so here I go! I am going to write a bit more (or shall we say bore more?) :). 

One of my greatest challenges as a wife & mom is the whole cooking thing. (wha?!) Yep, not exactly my favorite thing to do - spend two hours cooking to gobble something up in less then 2 minutes... Ever since I decided to start chewing my food (epiphany in my twenties coming from a family with eight kids), I actually 'enjoy' food, and fill up before I get sick. This 'enjoying of food' and the fact that my husband loves a warm cooked meal (a man thing?) - I started putting more thought into creating a healthy meal plan. Here is this week's fall plan - most recipes from Skinny Taste Blog:

Butternut Squash Lasagna Rolls | Loaded Sweet Potatoes | Parmesan Chicken Nuggets & Garlic Mashed Cauliflower | Parmesan Chicken Salad w/ Craisens | Salmon & Acorn Squash | Thawed out Butternut Squash Lasagna Rolls

Ha - there's my lazyness - last two days of the week are fish (freezer to oven BAM! done!) and whatever I made in the beginning of the week (freezer to microwave BAM! done!)

Okay, lets cut the [healthy] crap. The real reason for this post is to share my favorite fall indulgence, a recipe given to us for our wedding by a friend of my husbands family: Pumpkin Ribbon Bread

Cream Cheese Filling: 6 oz cream cheese, 1/4 cup sugar, 1 tb. flour, 2 egg whites. For filling combine in bowl - set aside.

Bread: 1 cup pumpkin, 1/2 cup apple sauce, 2 eggs whites, 1 tb. canola oil, 1 2/3 cup flour, 1 1/4/ cup sugar, 1 tea. baking soda, 1/2 tea. salt, 1/2 tea. ground cinnamon, 1/2 tea. ground cloves. In a bowl beat pumpkin, egg, egg whites, applesauce & oil. Combine the flour, sugar, baking soda, salt, cinnamon, clove; add to pumpkin mixture.  Divide 1/2 batter in 2 8" x 4 " load pans coated with cooking spray. Spread each with filling then top with remaining batter.

Bake 350 degrees F for 40 - 50 minutes Cool 10 minutes before removing from pans to wire rack.  

pumpkin bread.jpg