Before you hire a graphic designer...

How do you pick a graphic designer? My advice is checkout several. Don't ask them to do free work (i.e., make a pitch for you or show you 'what they can do'). Instead, check out their portfolio. This is going to tell whether or not you like their style. Don't let anyone convince you they can do something - let them show you that they already have.

Once work begins, they should extensively ask about your business goals with the project and about your audience needs. 

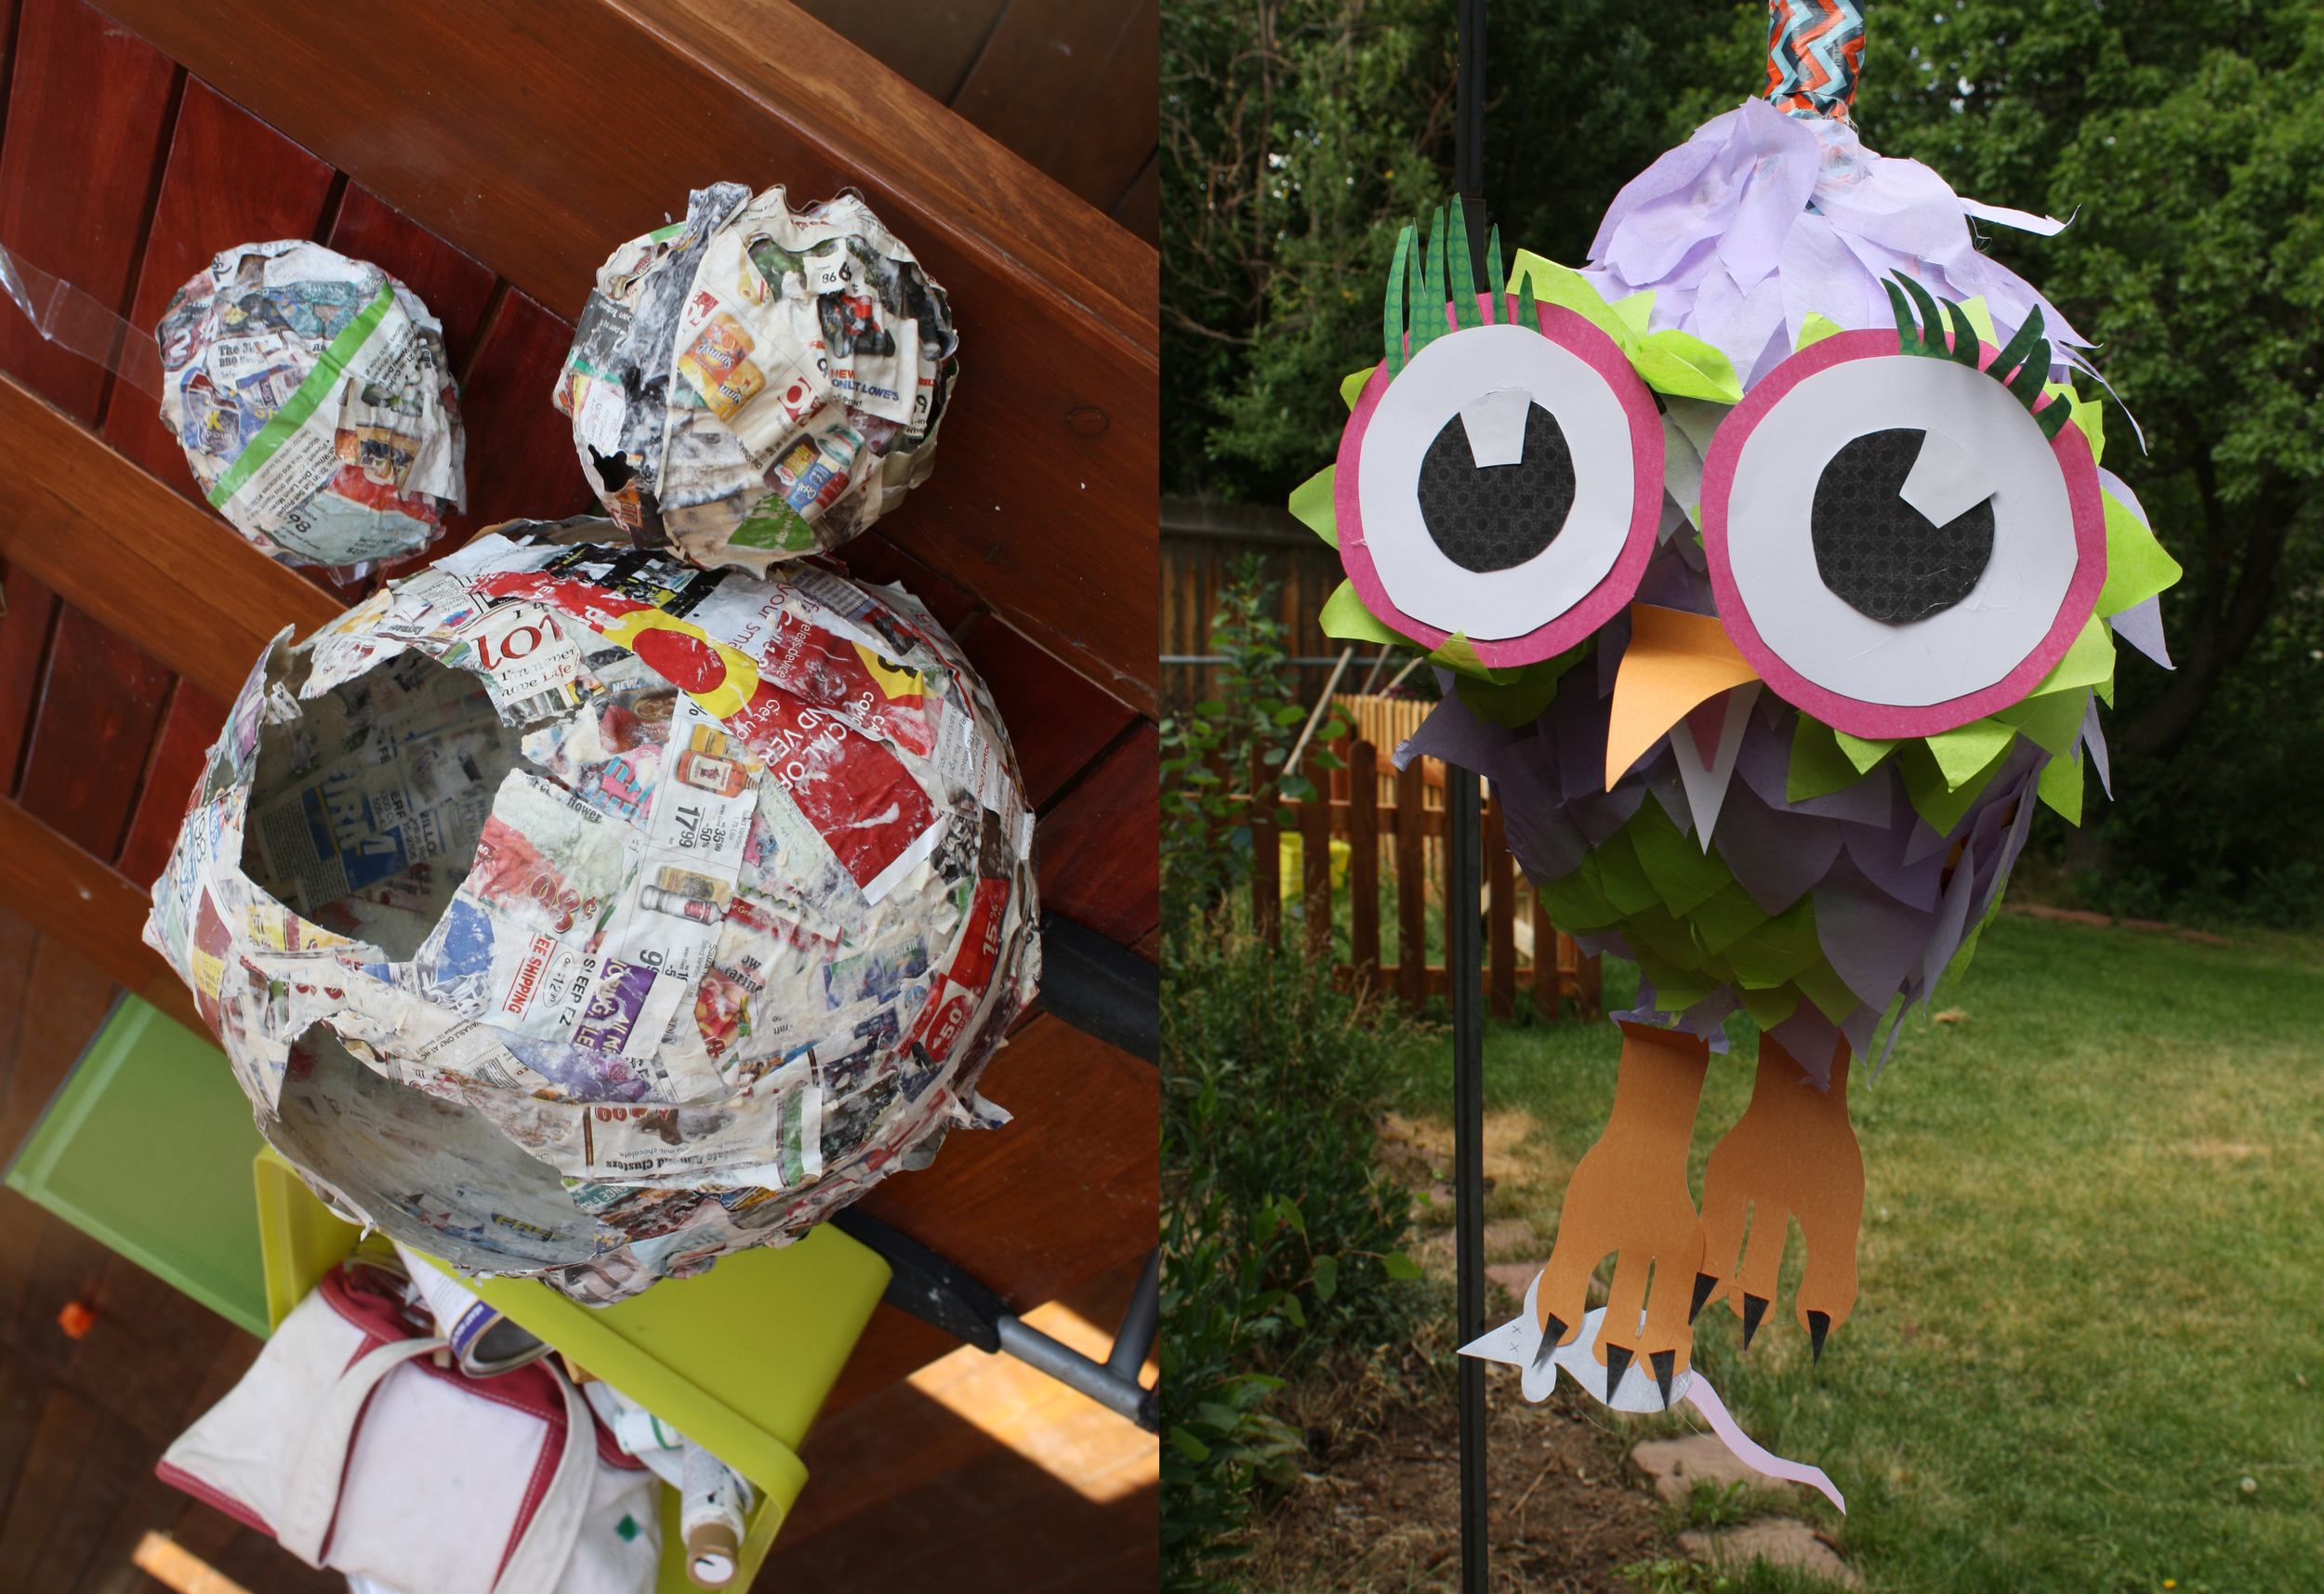
Know the difference between an artist and a graphic designer.

The difference between an artist that paints a canvas for example, and a graphic designer is:

- An artist expresses themselves and makes something beautiful.

- A a graphic designer solves a communication problem via graphics. They need to know your audience. Their end result might not be beautiful if beautiful is not the end need (e.g., and emergency exit map should stand out with bold colors - not blend in beautifully...)

Side Note: Graphic designers are artists though and they do have a particular style. You need to research this style via their portfolio when you hire them and then you need to trust their artistic instinct (after all, that's what you hired them for!). There is nothing sadder then a client that is bailing out a lot of money and insists on using a color or font that looks, well terrible. 

Here are my a couple graphics that the designer (or lack there of) did not consider the audience:

The L and the I are so close, I did not think this said Flick the first time I opened it... Flick Box is a Kids Songs and Rhymes channel - besides the instant view of a major potty word, this logo doesn't really scream kid friendly - wheres the colo…

The L and the I are so close, I did not think this said Flick the first time I opened it... Flick Box is a Kids Songs and Rhymes channel - besides the instant view of a major potty word, this logo doesn't really scream kid friendly - wheres the color? and the hand written words? The audience (kids) probably were not considered for this design.

The words FREE BEER gets anyone to stop - but only to find out there is. no. free. beer... tear! Clever, but we walked passed this bar and moved on to the next because the sign pissed us off. The audience (us beer drinkers) deemed it a fail. It…

The words FREE BEER gets anyone to stop - but only to find out there is. no. free. beer... tear! Clever, but we walked passed this bar and moved on to the next because the sign pissed us off. The audience (us beer drinkers) deemed it a fail. It seemed super harsh considering how expensive beer is in Iceland!

Why should you hire someone who calls themselves an artist, i.e., a painter or whatever?Because self expression, even in the midst of a busy city walk way - is beautiful, and art is part of a culture that makes us human. Oh - and that beautiful moment is worth paying for so support your local artists! Hows that for an answer? ;)

Cat staring at painting in Reykjavik, Iceland.

Cat staring at painting in Reykjavik, Iceland.

Good luck on your next project. And, I would be interested to know: what graphics have you seen that seemed to lack audience input?

Magical Princess Birthday Party Ideas

Party Disclaimer: I love having parties. The best part? Getting ready for them. My main advice is that if you ain't having fun, then don't do it! Having a party can be super stressful if you don't plan ahead and if you are trying to create a bunch of crap you saw on Pinterest that you're not really excited about. IF you are excited about the crap you saw in Pinterest, then do it! But most importantly have fun. 

Choose 2 or 3 "projects" to do to make the party extra special. For this Frozen party, I chose to do awesome-photoshopped birthday invite of my girls as princesses, an Elsa Barbie cake, and an Olaf piñata. Here's how:

1. Photoshopped invite: I put my girls in their princess dresses thinking I would get an adorable picture of them both smiling at the same time. Yeah right. Instead I took the funny pictures of them in character wearing their dresses and put it over a Frozen scene. Added text, some graphic elements & filters - and Bam!, Awesome Invite. Don't know how to do that? Call me. ;)

2. Princess Barbie Cake - There are a lot of videos on how to make one of these by baking your cake in a bowl to create the shape of your dress. My sister used to do wedding cakes, and she said that's not that great of a way because it can come out uneven. INSTEAD, bake a bunch of sheet cakes, and freeze them. Then, stack the cakes, cut a hole in and insert barbie (w/ hip joints wrapped in plastic). Then shave the cake into a dress, and frost. We made marshmallow Fondant (1 bag marshmallows, 1 bag powdered sugar) to create the dress this video and Fondant Snowflake Cutters to create snowflakes for the cake and cupcakes - but you could just use regular frosting. In fact, if you want to keep it fun (and in my case, not hear your husband say a bunch of potty words while I made him roll out fondant that wouldn't stick together... ) then just use regular ol' frosting. But, if you are over ambitious watch this video by Ann Reardon.

3. Olaf Piñata. If you've never made a pinata, It's a lot of fun but super messy. You just mix flower and water to a glue -like consistency and dip in strips of paper. You glue these strips in a thin layer around a balloon (or several to cut and create final shape), wait till it dries, and repeat until its a few layers. Once it fully dries, you pop the balloon, glue together with a hot glue gun the shapes you need (we used to circles, and cut the top of of one). I added a layer of duct tape around the thing and create a loop to hang the piñata. I also added more duct tape where I saw fit to make it more difficult to break. Use hot glue to decorate with tissue paper to decorate. Because we had a bunch of two year olds, they got to hit it with a foam sword (did nothing) and then I had my hulk-of-a-brother bust it open with one swing with a stick. Pixie sticks went flying ten feet in the air, and needless to say, the princess guests were thrilled...

Other things we did: Goodie bags with bubble and Frozen tattoos (no more candy please!), Frozen Punch (Mix 50/50 Hawaiian Punch w/ Sprite), and a Blue Chocolate Fountain. 

To Make a Blue Chocolate Fountain: Add Wilton Candy to your chocolate fountain. We used three 12 oz bags and then added about a half cup of Vegetable Oil to help it run Smoothly. We used Marshmallows and Oreos to dip in. Note: DO NOT ADD NON-OIL BASED DIE TO WHITE CHOCOLATE. Adding a non-oil based liquid to chocolate will cause it to cease up.

That's all for now! Hope you're party is magical. And, well - hire me if you want that awesome invite! ;)

How to create color palettes with your iPhone

The Adobe Kuler App rocks. It takes a photo from your phone and creates a color palette. You simply download the app, press the little "+" sign, decide what photo to use, and BAM! Color pallette created. You also have the option of choosing what type of color palette: Colorful, Bright, Muted, Deep, Dark, or Custom (you choose).

Check out these palettes I made using pictures I took of wildflowers around Los Alamos (and one Jemez).

Can you guess the wildflowers I used for the following palettes? (Answers at the end of this blog)

If you are an Adobe user - you can place them in libraries and then sync it with your adobe libraries. I created a wildflower library.

How is this so useful? I had a client ask me to color her logo using colors from a candle. I gave her lots of color options, but the option below I could show her directly how I used her candle for that particular color option.

Interested? Check out the instructional video below. As for the flowers we have: Purple Geranium (Los Alamos -  Quemazon Nature Trail), Prickly Pear Cactus (Jemez - McCauley Hotsprings Trail), Scarlet Penstemon (Los Alamos -  Quemazon Nature Trail), & Yellow Blanket Flower (Los Alamos -  Quemazon Nature Trail). Have fun creating palettes!

Thanks for reading!

Kitchen Update on a Budget

Our New Kitchen

Our New Kitchen

We drastically updated our kitchen without replacing any appliances, counter tops or cabinets, hence, it was pretty affordable!

Here is what we did:

- stained the kitchen cabinets to a dark, stunning espresso color using General Finishes Java Gel

- added stainless steel bling (faucet and hardware). The faucet was an (awesome!) gift from Ian's parents - thanks John and Lydia!

- upgraded the lighting to recessed LED lights (seven total, our kitchen is SO bright now!)

- upgraded back splash to almond subway tile (EXACT same color as counters) and bone colored grout

- took out overhanging cabinets that blocked the dining room

- put an orbital chandelier over the table in the dining room

- refinished our Avonite countertops (this solid surface can just be sanded down to remove any scratches/dents)

What did we learn about interior design? KEEP IT NEUTRAL!

Initially I wanted a colorful glass black splash and funky pendant lighting - but thanks to my sister who is an amazing designer, we kept it all VERY neutral. Why? Because A) you can always have fun with accent colors, e.g., copper canisters or bright orange KitchenAid, and B) it makes our kitchen feel relaxing, like the inside of Starbucks.

Find a Reference Picture of Your Dream Kitchen.

When designing your kitchen, find a picture of a kitchen you love, and use it as a reference. Or a cafe, or whatever. Some stuff I initially wouldn't have chosen on it's own, but it looks great when it is combined with everything else, e.g., the stainless steel drawer pulls and recessed lighting. You don't have to copy everything, but having a 'concept' kitchen is a great way to not make a major mistake.  This was our concept kitchen. Again, we also thought of the interior of Starbucks...

Don't choose something that doesn't match the style of your house, like a kitchen with massive marble columns and views of a tropical beach - unless you have that... you lucky duck.

Go safe.

I initially wanted brown cabinets but we would have had to completely sand down our 1990's yellow-oak cabinets and restain them. Who has time for that? Luckily, there is stain you can apply over stain. (Minwax Polyshades and General Finishes). We chose General Finishes Java Gel. Why? Staining this dark of a color gives consistent and even results (versus staining with something like a Minwax Polyshade random brown that gave you a surprise new color when added to whatever color you previously had...) It wasn't what I initially wanted but looks so good that I cant help but love it.

A can of Java Gel is $22 and a little goes a long, long way. We bought less than two cans, and we have about 26 cabinet doors + drawers and frames. This was the most drastic change, and is insanely affordable.

The tiles/grout we chose was also the SAFE option because it would make the back splash NOT stand out.

Going safe and neutral might seem boring, but it gives you permission go wild with the things that are NOT permanent! Like funky canisters and ceramic chickens and massive signs that say "EAT" - then, when those things annoy you or get outdated, you can easily pick a new style! Or heck, be seasonal with your kitchen decor! Yay for Santa Claus cookie jars! I am going to have fun...

Other things we did were:

-put our coffee makers permanently in a cabinet. We drilled holes in the bottom, pulled the cords through - and voila, now we have a even more counter space!

- Removed all the STUFF from counters: My husband claimed my orchid was dead (debatable but whatever). And he threw it away. We permanently put away anything we didn't use everyday., e.g., KitchenAid, tagine, Darth Vader toaster (despite protest from the hubby) etc. Now we don't have a bunch of random junk on our counter tops and we don't look pro-Dark-Side.

- We bought pretty baskets from Ross to put any random cereal/bread/goldfish/snacks that accumulated on top of our fridge.

- Removed toddler locks. I am actually regretting that...

Yes, that upper pic was the "clean version" of my kitchen. I don't miss those cabinets at all.

Yes, that upper pic was the "clean version" of my kitchen. I don't miss those cabinets at all.

Isn't the orbital chandelier awesome? I feel like a little mini-motorcyclist-leprechaun from a 1950's circus could do some awesome tricks in there...

Isn't the orbital chandelier awesome? I feel like a little mini-motorcyclist-leprechaun from a 1950's circus could do some awesome tricks in there...

Okay so I went a little crazy testing grouts but I am so glad I did! The Mapei Bone grout is way lighter than the color chart said it would be. Dark grouts are great for floors because they hide dirt. But - we decided to go with the light grout beca…

Okay so I went a little crazy testing grouts but I am so glad I did! The Mapei Bone grout is way lighter than the color chart said it would be. Dark grouts are great for floors because they hide dirt. But - we decided to go with the light grout because  A) it is on the wall so won't get dirty as easily, and B) a dark grout would create long, crazy contrasty-busy-looking patterns. We have a alley kitchen, so we don't need anything making it feeling longer or narrower... Also, we found that the thinner grout lines seemed crisper and cleaner. There were no spacers used when installing the back splash (the almond-colored subway tiles have a little bump on the edges so there still is about a 1/32" gap).

Again - we were really tired of having STUFF take up all our counter space, so we put the coffee makers in the cabinet. Yep - they are plugged in and functional, so you can open the cabinet, grab a mug and choose decaf or regular! Genius...

Again - we were really tired of having STUFF take up all our counter space, so we put the coffee makers in the cabinet. Yep - they are plugged in and functional, so you can open the cabinet, grab a mug and choose decaf or regular! Genius...


Pulled Sugar Spirals - a perfect valentines day garnish...

cupcake.JPG

These are so much fun. How you ask? Pretty easy - but I definitely recommend two people, thick gloves and no kids - as melted sugar is HOT. I also recommend watching YouTube videos of pulling sugar first too so you get the general idea.


 You need

1 cup sugar

1/3 Cup corn syrup (I use light corn syrup as it won't mess up the color)

2 tablespoons H20

Few drops of food coloring (red in this case) and flavoring if you want it (cherry in this case)

Thick Gloves (or several layers of thin ones

Silpat or Parchment paper

Knife sharpener

Put the sugar corn syrup and water in a pot. Turn to medium heat and stir a bit until boils. Use a pastry brush with water to 'paint' off any sugar crystals that stick to the edge (these will make your end result cloudy) Then let boil for about 4-5 minutes. The minute you see a bit of it turn golden brown, take it off the heat and pour onto Silpat or parchment paper. It's ridiculously hot, so be careful.

Now you basically have a pile of hot lava. You need to put on gloves and wait a few minutes before touching it. Eventually you should be able to touch it (WITH THICK GLOVES ON) and pull edges up from the paper. If its still sticking to paper, its too hot. Once you can get the glob of melted sugar off the paper, basically keep folding it on to itself. Pull it out, fold it over, and repeat until it gets shimmery (this is because you introduce air into the sugar.) Now you have to work QUICKLY, because if you pull it out too thin, it will harden quickly. As soon as it shimmery, pull out a thin strand, wrap it around a knife sharpener, and cut it with scissors. First one done. Try to pull out, wrap and cut before all the sugar hardens. If it hardens before you finish, you can stick it in the microwave for small increments until it melts and start over. I recommend two people so one person can hold the knife sharpener while the other one wraps. Good luck! And don't burn yourself. And if you do a little, it's worth it


Christmas Party Ideas and Frozen Gingerbread Castle

Christmas parties are way too fun. Why? It's the time of year to give yourself a free pass and drink all the eggnog your stomach can handle (I have yet to discover my threshold). It's also a great excuse to cook from the Betty Crocker Christmas cookbook (cans of cheese soup as a main ingredient wouldn't fly come January). I am going to go ahead and say it: Betty Crocker Christmas cookbook is amazing. We use it every year, and it has the best, simplest, stress-free super tasty recipes. ( sorry fans - no quinoa or kale). Great gift idea - although maybe your mother has one that you can eternally borrow, like we did.. ;)

Betty Crocker Cheese Balls

Betty Crocker Cheese Balls

I have found to set a very beautiful food table, its a good idea to have different heights for serving plates - it adds a lot of dimension and makes a table look awesome.

For a fairly cheap decoration, put leftover tree branches with a few red roses in a jar. You can take off the top metal hanger-part of a round ornament, leaving a hole, and stick it upside down on a bamboo skewer to add another element to this Christmas bouquet. You can also glue a bamboo skewer to a pinecone.

Simple rose and tree branch bouquet

Simple rose and tree branch bouquet

As for drinks, here are the best ones we had:

Gingerbread Martini:  Mix with shaker/ice: 1 oz vodka,  1/2 oz Kahlua, 1 oz Gingerbread syrup*, 1 oz half n' half. Top with whip cream and gingerbread cookie.

* You can get Gingerbread syrup for 12.95 at Starbucks - they sell it behind the counter so you have to ask and in my case the employee wasn't too sure, so you might have to ask a manager.

Peppermint Hot Chocolate:  This you can leave on the stove top while people help themselves. Use Hersheys Cocoa (4 cups milk + 8 tbs cocoa + 4-8 tbs sugar) and add Peppermint Schnapps to taste. Top with whip cream, red sprinkles and a mini candy cane to get yourself ready to "Baby It's Cold Outside" karaoke.

Hand-painted Checkerboard Table

Sigh, I have two minutes to write this. 

For this project I wanted to tie in this previously red kids table with a pink & purple kitchen set I got for my girls' b-day's. I also wanted a checkerboard on it.

My advice when hand painting anything is make sure you have an example of what to look at. (In this case, I matched designs to the rug.) Plan it out in advance (i.e., draw out the project so you can get an idea of the final).

Also, use a ruler for the checkerboard and center it. I used 2" squares to keep it easy. My husband did the straight board using tape as a guide, but I hand-painted the checkers to tie in all the other hand-painted designs on this table.

 (don't trace everything out or you'll forever have some pencil marks)

Also, don't leave it outside when it's raining. That's it! hope you like it! 


Quick Tips on Professional Looking Photos: Using soft light

As a photoshop fanatic- I used to always just take photos with the idea that I could fix the lighting later - THIS IS FALSE! You can do a bit in photoshop, but you NEED nice lighting! Nice lighting is from either : a really fancy professional lighting kit (your regular ol flash is going to might just wash everything out) for you camera OR NATURAL light! That's right, gobs, and gobs of this come for free, each day from the sun. The problem is that direct sunlight is really intense and with the intense bright light come intense black shadows in your pictures. So, to utilize this beautiful light, you need it filtered. Here's a few ways to do just that:

1. SUNSET/SUNRISE Take at either right before the sun rises or right after the sun goes down for that beautiful, golden soft light. I found if you take a photo while the sun is still low in the sky you get really, really long black shadows.

2. NEXT TO A WINDOW Take the photo near a window with ample light through. Have your subject facing the light (don't have the light behind them) so it reflects on their face. 

Frankly both of these photos are pretty cute - but you can tell major differences in the quality of the photo. Flashes bring out everything - from alien eyes to shiny drool. Natural light gives that 'porcelain skin' look  and brighter eyes.

Frankly both of these photos are pretty cute - but you can tell major differences in the quality of the photo. Flashes bring out everything - from alien eyes to shiny drool. Natural light gives that 'porcelain skin' look  and brighter eyes.

3. IN THE SHADE - yep, pull the person in the shade or covered area so light comes through the sides and brightens them up. If the shade is tree, make sure there isn't any light spots shining through branches.


Covered porches are such an ideal spot for a family photo. Before an event (such as a wedding or reunion) scope the area for potential places (big windows, covered areas) and maybe plan some photos around there. Sounds like overkill - but especially when photographing distracted family including kiddos - you might only get one chance for a great photo. And, you should enjoy the event and not being trying to take perfect shot-in-the-dark (no pun intended) photos everywhere!

This is on a covered (shaded) porch. Again, more light brightening the eyes, and lovely skin tones.

This is on a covered (shaded) porch. Again, more light brightening the eyes, and lovely skin tones.

4. WAIT FOR OVER CAST - Clouded skies make for lovely lighting. My non-professional wedding photos are awesome because it was overcast that day. Brides should not complain about rain on their wedding day!

Left side - sunny & dark shawdows kinda ruin this shot. Later on, after monsoon clouds rolled in, the forest seemed to glow with lovely light.

Left side - sunny & dark shawdows kinda ruin this shot. Later on, after monsoon clouds rolled in, the forest seemed to glow with lovely light.

So, that's a few quick tips. If you taking a portrait photo, you get better skin tones and natural color - faces aren't ten shades lighter as with a flash or bright sunlight. Eyes look brighter, and you aren't getting really intense shadows or highlights. If you're taking a landscape, the less contrast you see is going to register what you actually see in real life (you're not seeing shadows as contrasty black spots in real life, although a photo registers them like that - if that makes any sense.)

So, turn off that flash & happy photo taking!

Owl Birthday Party

I know, her eyes are huge!

I know, her eyes are huge!

My lil' Donna is turning one. We had an owl-themed birthday party because with her wide, never blinking eyes she basically looks like an owl. And they're cute. We made cookies with a $1 owl cookie cutter. We made the cake with a 6" and 8" cookie pan. We home-made a pinata and decorated paper lanterns like owls (not my idea, there's a million online so I'm not posting photos of that). It was super cute, fairly cheap, and my daughter (who just started walking!) walked around with a big grin on her face - she totally knew it was her day. :)

Got this idea from something similar on pinterest, but we did it a bit differently so I thought I'd post.. 

Got this idea from something similar on pinterest, but we did it a bit differently so I thought I'd post.. 

Not that hard - mix flour and water as a glue and glue strips of paper to balloons. Let dry for 24 hours then use hot glue gun, tissue paper and scrap paper for decoration.

Not that hard - mix flour and water as a glue and glue strips of paper to balloons. Let dry for 24 hours then use hot glue gun, tissue paper and scrap paper for decoration.

My little sister Kristen posted these pictures - cookies decorated by her and my brother and the crepe paper by my mother-in-law Lydia who is a middle school secretary and crepe paper hanging genius!

My little sister Kristen posted these pictures - cookies decorated by her and my brother and the crepe paper by my mother-in-law Lydia who is a middle school secretary and crepe paper hanging genius!

Cheap Wedding Centerpiece Candles

My wedding was absolutely awesome. Alas, we had no extra money so literally everything from the cake to the smoked pig to decorations were done by family members or close friends - which made it even more special! 

Wedding decorations are SO expensive especially  if they have that 'wedding' label. For centerpieces, we got bulk flowers from Cosco and Sprouts (due to a wrong delivery and last minute need for flowers...). We got a lot of random decor from oriental trading company and the burlap on sale at Joann's Fabric.  I always wanted to get married at our local ski hill, but due to the time of wedding, I just got a thin-fallen aspen tree, cut it up and my dad and I drilled shallow holes with a drill press & 1.5" spade-bit (I call them paddle bits?) in the pieces. A tea candle fit perfectly. It was really cool to do a project like that with my dad, fairly quick, looks great, and really economical.

We used the paddle bit again to make birdhouses. This time my husband used it as a drill attachment, which I highly recommend clamping whatever you are drilling into securely or it will spin and be well, dangerous.. 

This candle went perfectly with our burlap/sunflower wedding theme. 

This candle went perfectly with our burlap/sunflower wedding theme. 

Each of my nieces and nephews made these, their individual styles really shine through!

Each of my nieces and nephews made these, their individual styles really shine through!

Quick Tips on How to Design a Party Invitation

Invitations. Here are the basics that I discovered while recently designing an invite for my sista's baby shower: As for layout - block out spaces in an un-symmetric-like manner. Divide text with images/graphics that are party-themed and don't be afraid to vary texts sizes and styles. If there is too much white space that looks uneven, add a dotted line or a little graphic to balance it out.  If you want to do this for cheap, print the invitation out on your own paper and glue to the top of whatever scrap paper you have and top with whatever ribbon you have. Thread a ribbon through the top to give it a personal touch.  See example below.

Yes, I know, I can't cut straight with scizzors. or spell sciszorzz. 

Yes, I know, I can't cut straight with scizzors. or spell sciszorzz. 

Another take on the same invite

Another take on the same invite

and, yeah, don't use pinky-red and purple together.

and, yeah, don't use pinky-red and purple together.

Quick Tips on How to Design a Logo

Logos are essential to branding your business. The biggest mistake I made initially when learning to design logos was making them too complicated. Take the time to look (and perhaps try to draw) some top logos: Fedex, Cocacola, amazon, Apple, Disney, McDonalds - they aren't that complicated? When designing your logo, work backwards. Think:

1. Size: What size will the logo be? (a one by two inch space on a letterhead? Only on my website banner? On a billboard?) If it's going to be tiny and printed, make sure it looks great in black and white and without a lot of detail.

2. Color: Logos should look good in black and white. In some situations, your logo may mostly viewed digitally so you can be a more liberal with color and gradient (like the mozilla firefox logo and x-box 360 logo).

3. Elements: Keep it simple. Maybe a unique type (like in Coca Cola) or a tiny cute little element (like the arrow in Fedex). 

4. Research logos you like. Figure out why you like them. (simple? unique? a certain style?)

5. Brainstorm! What are adjectives or elements that describe your business? Do you want  a feeling of movement in your logo? 3D appearance? 

5. Sketch out your ideas. Even if you are terrible at drawing, you can go through so many more ideas and visualize it beforehand.

5. Then, go to the computer and draw it out.

Or, skip all that and call me. ;)

Photo Book Gift Idea: Using your photography to illustrate a poem or story.

Everybody loves Photo Books. They are sentimental. They are easy. There are endless templates on Snapfish and Shutterfly and Walmart to make them look professional. You're not going to get glue all over your fingers and spend hundreds of dollars on fancy stickers - which is what the die-hard scrap-bookers do, and frankly - a Photo book might look nicer. 

For Mother's day, I took a poem my momma wrote that I always loved. Yep, she is a closet poet. I got a photo from each of my sibs to illustrate the pages. The result was a beautiful book with sentimental photos from all around the country - each from a different kid. I have seven siblings - so I got my material from them and just put it together. You could use a poem from someone a bit more famous, or even a favorite story, and then illustrate it with your own or perhaps your own kid's photography (I am amazed at the photos my 9-year-old brother takes). Below is the result :).

Photo by Joey - Age 14 - Squaw Valley, CA

Photo by Joey - Age 14 - Squaw Valley, CA

I want to leave to a lonely place
where the mountains touch the sky,
Photo by Julia - NM

Photo by Julia - NM

with no other soul to see my face
and no one would here me cry
Photo by Jack, age 9 - Yosemite CA

Photo by Jack, age 9 - Yosemite CA

A quick escape to a quiet retreat
with wild things for my company,
Photo by me - Taos NM

Photo by me - Taos NM

soft meadow grass beneath my feet,
no one there to make little of me
Photo by Kristen - Portugal Beaches

Photo by Kristen - Portugal Beaches

 Photo by Laura - Grand Tetons


Photo by Laura - Grand Tetons
I want to rest on nature’s breast
freely choose to laugh or scream
Photo by me - Jemez NM

Photo by me - Jemez NM

only replied from a meadowlark’s nest,
a drone of a bee, or a rush of a stream
Photo by Skip - Southwest

Photo by Skip - Southwest

I want to go to a hidden spot
with a cabin build for one alone,
Photo by Sophie - El Paso TX 

Photo by Sophie - El Paso TX 

where the breeze is cool and the sun shines hot.
The doorbell’s missing and there won’t be a phone
Photo by me - Garden of the Gods CO

Photo by me - Garden of the Gods CO

I won’t need a mirror out in God’s beauty
for I’ll feel strong and connected and wise,
Photo by Bertie - CA

Photo by Bertie - CA

no acting for others, no pressure or duty,
I’ll sleep when I want to, I’ll rise when I rise.

Pretty, huh? I love that poem, and the pics. It made for a fun and sentimental mother's day gift.

How to Design your own Custom Table

For our own dining table, we couldn't exactly find the perfect plans online. I wanted a black farmhouse table that would fit in our tiny kitchen nook. I absolutely love what we came up with:

Isn't it a beauty? 

Isn't it a beauty? 


 Things I considered were:

- Cost effective - we used this apron & legs from a Design Confidential plan because it used 2 by fours which are pretty cheap. We also used five four foot pieces for most of the table top (so we could just cut in half 8 footers, we have one extra piece to build a bird house...). We also used this stain called Rust-Oleum Ebony which is half the price as Minwax. We had extra outdoor Huntsman Urethane which we used because having two toddlers sit at your table might as well be like living outdoors. 

- I wanted NO horizontal braces due to the need to push in chairs & two high chairs.

- I also wanted very rounded corners because toddlers don't really look where they are going (okay, neither do I). 

- I wanted it black to contrast our wood floors and ceilings, as well as to go with a beautiful painting my sister did. 

- I wanted it farmhouse styl. We measured the area we needed and drafted a plan with measurements. We figured out the exact cut list BEFORE going to the lumberyard so we could plan it accordingly to reduce scraps.

- I wanted it REALLY sturdy. Our last table felt like it might collapse everytime we ate at it. We accomplished this with 4 by 4 legs.

Take home? Do it right the first time and square and measure everything. The first time we put this together it looked terrible due to a warped two by four. We took it apart, and put it back together with a few adjustment for the warping and it is now very solid.  

We did this after making our other table so we had a bit of confidence in building. It was really fun to come up with our own table top and make it fit our needs and wants. Starbucks has basically this same table (much longer, but with four by fours and a farmhouse top), proving this this design is meant for action. Thanks for reading! 

8 tips for building your own Patio Table or other Furniture.

To build your own furniture, check out amazing sites like Ana White and The Design Confidential We built the Pottery-barn Inspired 60 inch Chesapeake Dining Table from Design Confidential. The plans are totally free and awesome. (Even gives a cut list!) Tools we own are a sander, kreg-jig, and miter-saw. I exchanged some design work to have a friend taper the legs with a table saw because frankly I don't want a ton of tools I never use.  The Kreg Jig, Sander & Mitersaw we have already used this summer to build a fence for a dog run, a sandbox & 2 tables. Definitely worth the investment. Here's a photo of our lovely table:

Yep, I know, it's a beauty. Just don't look to closely... ;)

Yep, I know, it's a beauty. Just don't look to closely... ;)

Tips!

1. COST - Sure, maybe the wood will only cost your $50 to build a $500 table. But, you also have to count in time, tools (yikes!) and finishing products (Wood conditioner, Small can of stain $10, small can of polyurethane $10). I find this palette video pretty comical - sure! your making a table out of free palettes, but this looks like it was done with $2,000 worth of tools.

2. TIME - I was amazed at how long this project sat out on our porch. We did four layers of stain plus coated it with Huntsman urethane (for outdoor). It took MONTHS. My advice for figuring out how long a project is going to take is figure out how long you think you can do it in, triple that, and add three weeks. Then, if you have kids that interrupt, add two weeks per each kid. And then make a goal of finishing it before you die. Then, if you do happen to finish it, you will be really excited rather than being stressed out if you don't get it done in your original plan of a weekend.

3. SQUARE AND MEASURE EVERYTHING! (Don't trust your eyes.. ) We had to rebuild our custom table because one leg was an inch higher then the others when we decided to slap it together.  We redid it square (the culprit was a super-warped 2 by 4) and it now is pretty solid (without have to cut down all the other legs, which we were pretty tempted to do..)

5. FINISH IT WITH FINISH! & use stain conditioner. You might need several coats to get the looks you want. Pre-conditioning your wood will prevent that splintery patchy look.

6. KREG JIG  (what the jeepers is that?) You can build anything with this joint-making tool. I had no idea what it was, but it seemed like every plan I found used it. It's basically a tool to line up your drill perfectly so that you can  drill a hole perfectly for a screw to pull two pieces of wood together at a perfect angle. The you can screw together a joint ( rather then glue or chisel or whatever). You can screw together wood at a ninety degree angle or next to each other. 

7. You can use wood glue mixed with wood shaving as wood filler. I tried this and it worked quite well just be sure to sand off all excess glue as stain won't absorb very well.

8. Obviously,.. BE SAFE! Read all instructions, don't operate anything you are not comfortable with, maybe even take a wood-shop class. Fingers don't grow back. Also, don't be doing this if it stresses you out or if you are in a situation where you are easily distracted or not paying attention. This should be fun! If it aint, then go buy one or get something on freecycle. Again, let's not lose fingers now.

So that's it for now. I hope some of those images help you prepare a bit. I am far from being an expert, but those sites I mentioned before (Ana White and The Design Confidential) have ton of information and advice as well as examples. Good luck, be safe & have fun! I would love to hear comments on some of this stuff (as it is quite new to me) or hear about your home projects. Thanks for reading!